


Introduction
This document explains the procedure for creating presentation slides for the web conference.
For this web conference, you will use the narration function of PowerPoint to record your presentation and follow the instructions below to create your presentation data. For the poster presentation, the PowerPoint slides should be converted to PDF format.
Please submit your presentation data by January 15. Junuary 22.
For any technical questions regarding your data, please do not hesitate to contact us at the Gunma Congress Support e-mail: jtta2020@gc-support.jp
Note: The instructions for video submission will be available on the website at a later date.
■ Notes on Video and Poster Creation
- The presenter must disclose any conflicts of interest (COIs) related to the research in question at the time of presentation.
- The research on which the presentation is based must have been conducted in accordance with applicable research ethics standards.
- The presenter will assume full responsibility for the content of the presentation:
(a) The content must be unpublished.
(b) The content must not include the personal information of others.
(c) The content must not infringe on the copyrights of others.
(d) Images or videos of people must not be used without their permission.
(e) The presentation must not infringe on the intellectual property rights of others, such as designs and trademarks.
(f) The presentation must not be libelous or defamatory and must not be offensive to any particular person or group. - ISfTeH and JTTA will not be liable for any dispute between the presenter and a third party in relation to the content or presentation.
■ Upload data
1) Videos
- The video data can only be submitted in MP4 format.
- If you can only create MOV, WMV, AVI, or FLV formatted videos, please contact us.
- If you have a symposium or a roundtable discussion, etc., please submit a video recording of your discussion recorded on Zoom or another video conferencing application.
- There is no limit to the size of your video file; however, please keep the video file size between 720 and 1080 pixels in height (i.e., between 720p and 1080p) and do not exceed 500 MB per 10 minutes.
- Videos can be used in presentations but it must not be inserted as a hyperlink. If you want to use a video it must be embedded into the slide.
(2) Posters
- Only PDFs files can be submitted.
- The maximum size of submissions are 10MB per presentation.
■ List of Presentation Times
| International session | Presentation time |
|---|---|
| Society President’s Lecture | 15 minutes |
| President's Address | 15 minutes |
| Invited Lecture | 15 minutes |
| Symposium | 60 minutes total for all presenters |
| Company-sponsored seminars | 45 minutes or 60 minutes |
| Breakout Session | 60 minutes |
| General Presentation | 8 minutes |
| e-Poster (PDF) | 11 pages (including COI slides) |
■ About the Conflict of Interest (COI) Slide
The Conflict of Interest (COI) disclosure slide should be included on the second page (after the title slide). Download the template here.(coi_e.ppt)
The guidelines for conflicts of interest will be in accordance with the Journal Submission Rules of the JTTA. If no potential conflicts of interest exist, include the following statement: "No potential conflicts of interest were disclosed.”
If there are no conflicts of interest within the affiliated institution, include a statement such as "No conflicts of interest were disclosed."
Do not report on conflicts of interest in the name of the affiliated institution if the submission is based on formal procedures within the affiliated institution.
Report the names of the affiliated organizations for such categories as board members and advisors, stock ownership, patent royalties, lecture fees, manuscript fees, research grants, scholarship donations, endowed chairs, travel expenses, and gifts.
Lastly, keep in mind:
- The existence of a COI status is not a problem.
- The declaration of COI status at the time of submission is not for the purpose of review by the Society, but for recording purposes.
■ Procedures for Preparing an e-Poster (PowerPoint)
Step 1: Creating Presentation Slides
Please create your slides using PowerPoint or a similar application.
Please make the slides in the following format:
First page consisting of the title of the presentation, your name, affiliation, and co-authors.
Second page detailing any Conflict of Interest (COI). *see above for details
Third page and on contains the presentation content.
Step 2: Save as PDF
Steps on how to save as a PDF:
- When your presentation slides are complete, go to File and then Save As.
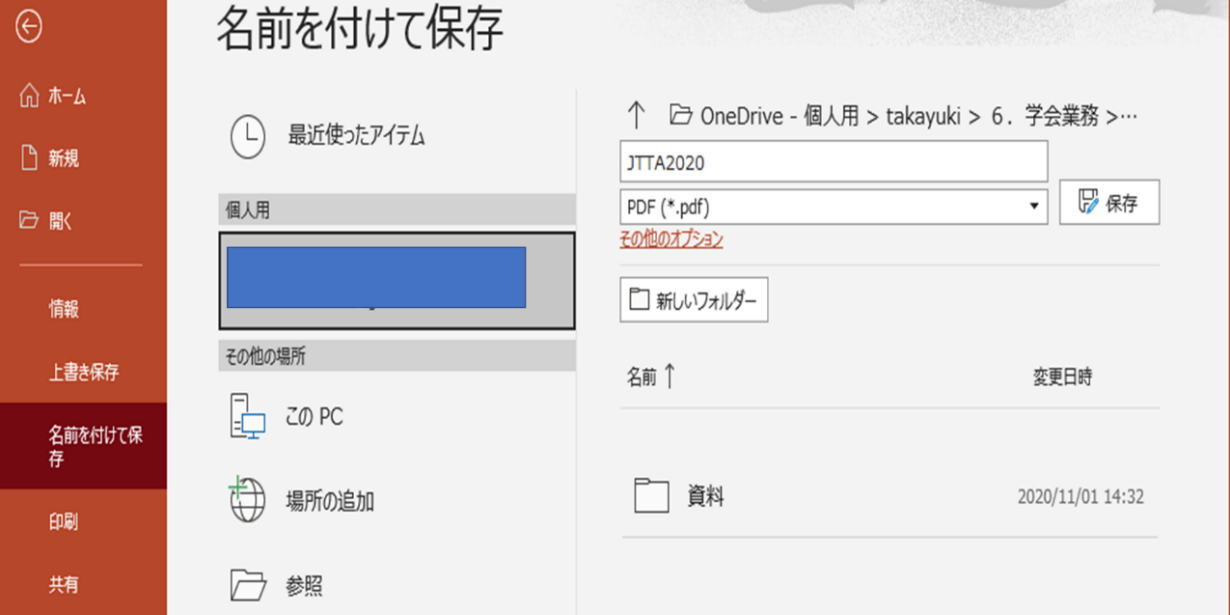
- Then choose the folder to save the file in.
- Name the file.
- Underneath it, make sure that the drop-down menu says "PowerPoint Presentation".
- When the drop-down menu appears select PDF.
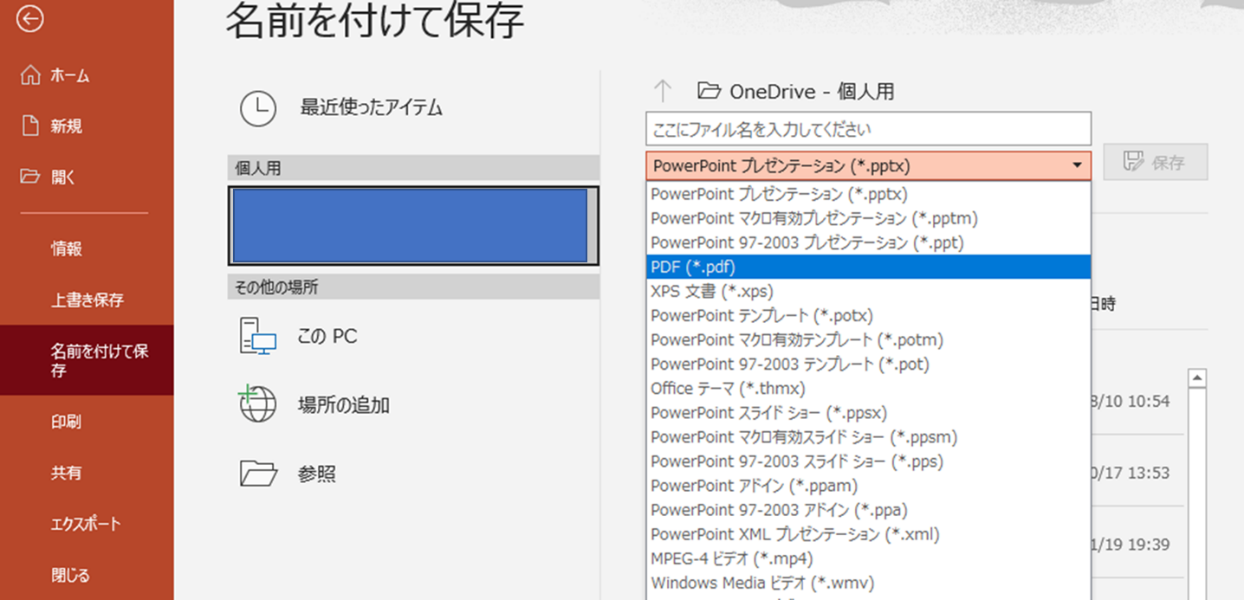
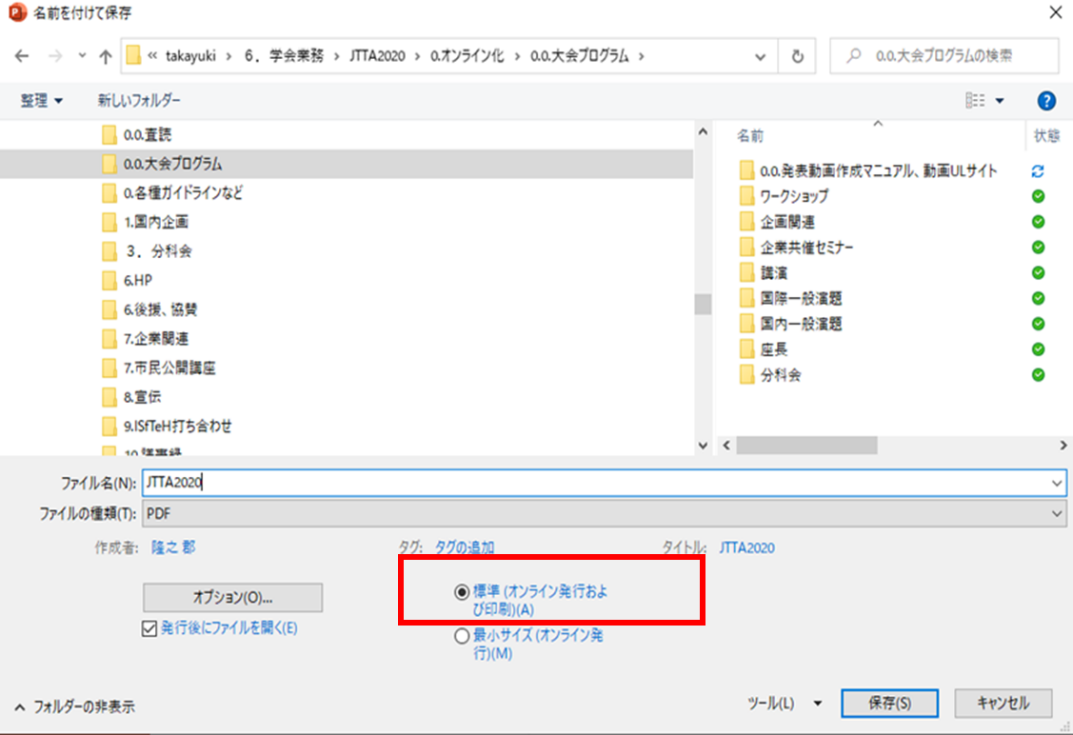
- After making sure that the file type is a PDF, click Save.
- Select Other Options and make sure Standard (Online Publishing and Printing) (A) is selected.
Below are instructions for creating video files.
■ How to Create an Audio Video (PowerPoint)
Step 1: Create Presentation Slides
Step 2: Preparation and recording of equipment for presentation data preparation
Step 3: Save as a movie file
Step 4: Confirmation and correction
Supplemental: How to record a general debate, etc., in Zoom
Step 1: Creating Presentation Slides
■ Creating Presentation Slides
Create your slides as you would for a normal presentation.
■ Notes on creating the slides
- Create your presentation slides using Microsoft PowerPoint.
- The recommended version is PowerPoint 2019 for Windows.
- Record your PowerPoint slideshow with narration.
- Save the PowerPoint by exporting it in video format (MP4).
- Please create your presentation as follows:
- First page: Title of the presentation, name, affiliation, co-authors, etc.
- Second page: Conflict of Interest (COI)
- From the third page on: Presentation content
- The video image height should be 720-1080 pixels and the video size should not exceed 500 MB per 10 minutes.
- Although Microsoft PowerPoint is encouraged, other presentation software maybe used to create the final video in MP4 format.
■ Step 2: Preparation of equipment for recording presentation
■ Preparation of equipment
Use the recording feature of PowerPoint to record. Make sure your computer has a built-in microphone.
If there is no built-in microphone, please prepare an external microphone.
■Start Recording
(1) Open Presentation Slides in PowerPoint and in the menu tab go to [Slide Show] > [Record Slide Show] > [Record From Top]. 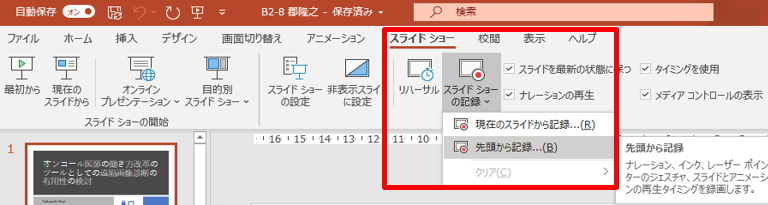
2) Click Record in the upper left corner of the screen to start recording.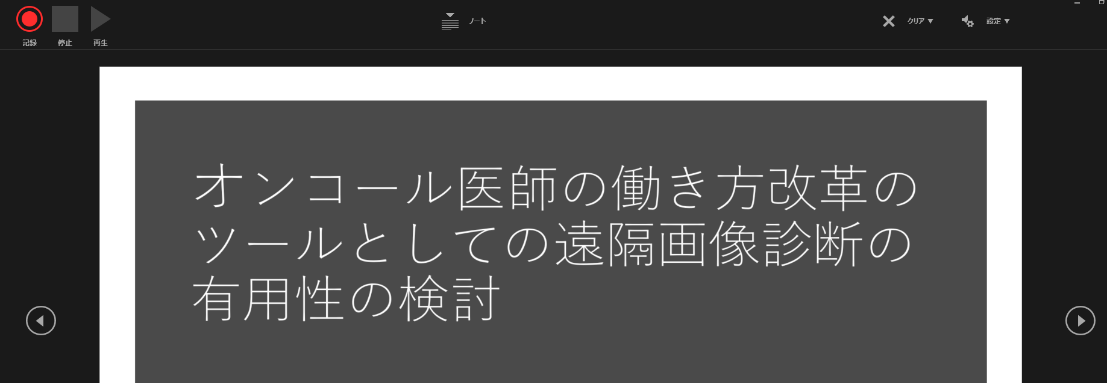
Also, turn off the camera's image if it is displayed.
While you advance through the slides, each page will be recorded.
(Reference) How to delete the narration
■Windows Version
When you click "Record Slideshow" in the Slideshow tab, you will see three options: "Record from Current Slide", "Record from Top", and "Clear". To delete your narration select "Clear". You can also delete all of the recorded data by clicking "Clear timing for all slides" and "Clear narration for all slides".
■MAC Version
The Mac version of the narration removal method is a bit laborious. This is because the recorded audio data is stored on each slide.
You can remove the audio indicator in the lower right corner of the slide, but you have to do this for all the slides.
Step 3: Save as a movie file (Windows)
■ Save
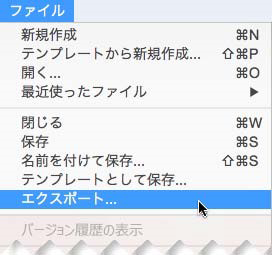
- Go to File > Save and make sure that all of your recent work is saved in the PowerPoint presentation format. This will be indicated with the .ppt or .pptx file extension.
- Next go to File > Export > Create Video.
- Enter a file name for your video in the File name box and click Save.
※Under File Type, choose MPEG-4 Video.
※You do not need to specify a file name.
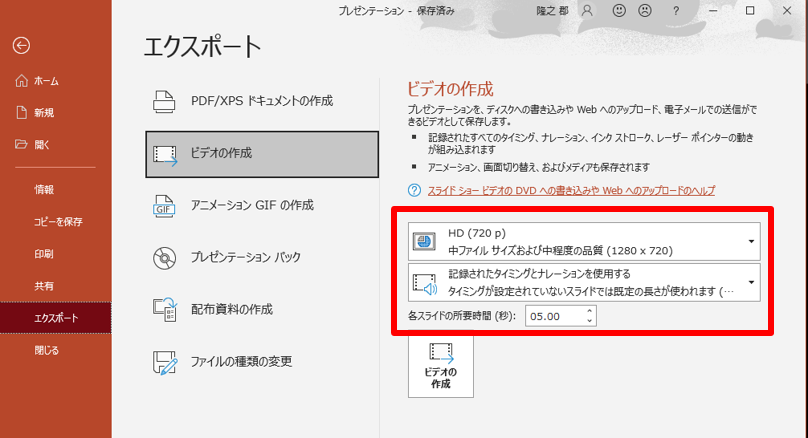
- Image quality is 720 to 1080 in vertical resolution
- Make sure to take advantage of the memorized timing and narration
Step 3: Save as a movie file (Mac)
■ Save
- Go to File > Save and make sure that all recent work is saved in the PowerPoint presentation format. This will be indicated with the .ppt or .pptx file extension.
- Go to File > Export > Create Video.
- Enter the file name of the video in the Export box and click Export.
※For File Format, choose MP4.
※You do not need to specify a file name.

Step 4: Confirmation and correction
■ Check
After recording, when you start the slideshow, you will be able to check the audio. You can also check the audio by clicking on the bottom right of the slideshow editing screen.
■ Correction
If you want to modify only a specific page, you can use the slide page while the slide to be modified is selected. Click the Menu tab and go to Slideshow > Record Slideshow > Record from Current Slide to record the correction.
■ Save
When all the work is done, click [Save].
Note: How to record a general discussion, etc. in Zoom
The official Zoom tutorial video can be viewed at the following address: https://support.zoom.us/hc/en-us
Additionally, there are a number of informative videos online. Please, search for "Zoom" and "recording".